Interfaces
Three interfaces can be used to interact with the OhmPi:
a Web interface: user friendly graphical interface to achieve basic operations for everyday use, such as running a sequence or repeated sequences.
a Python interface: based on the API reference, the Python interface allows basic and more advanced operations such as custom acquisition strategies and automation.
a IoT interface: based on the MQTT messaging protocol used in IoT, it is a framework to incorporate the OhmPi system within complex experiments designs comprising other IoT sensors.
Web interface
This is a user friendly graphical interface for new users as well as running quick and easy acquisitions. The webinterface enables to upload sequences, change parameters, run a sequence and download data. To start the interface, open the terminal in the OhmPi folder and type:
./run_http_interface.sh
The Raspberry Pi of the OhmPi is runs a small webserver to serve the ‘index.html’ interface. This interface can be accessed locally by opening a browser on the Raspberry Pi and going to http://localhost:8000.
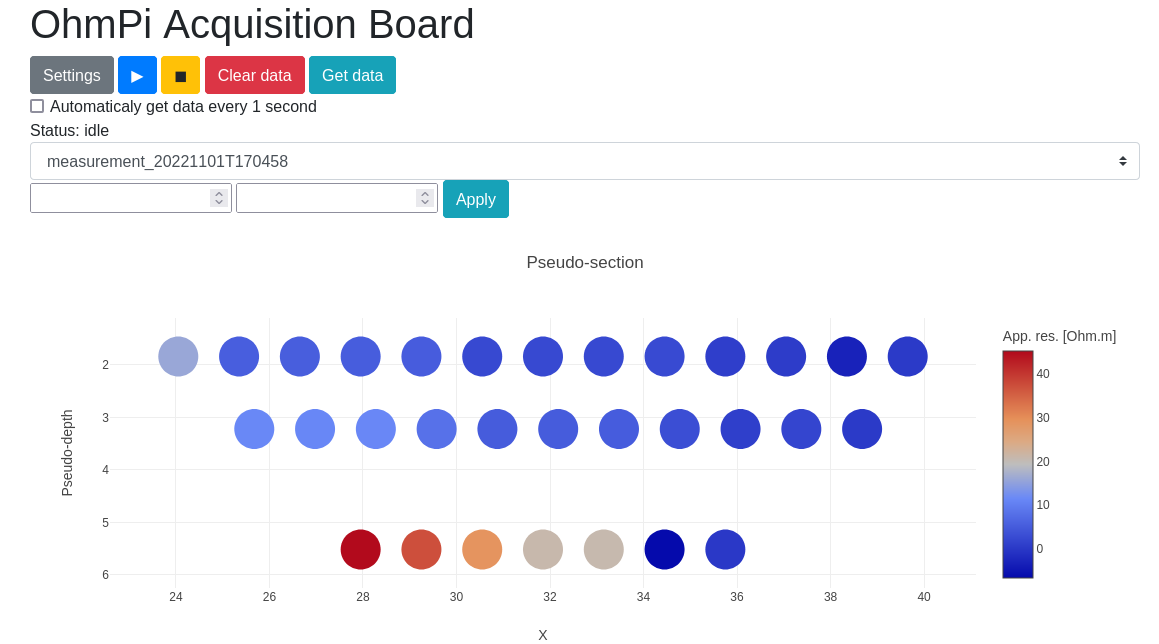
Web interface with its interactive pseudo-section.
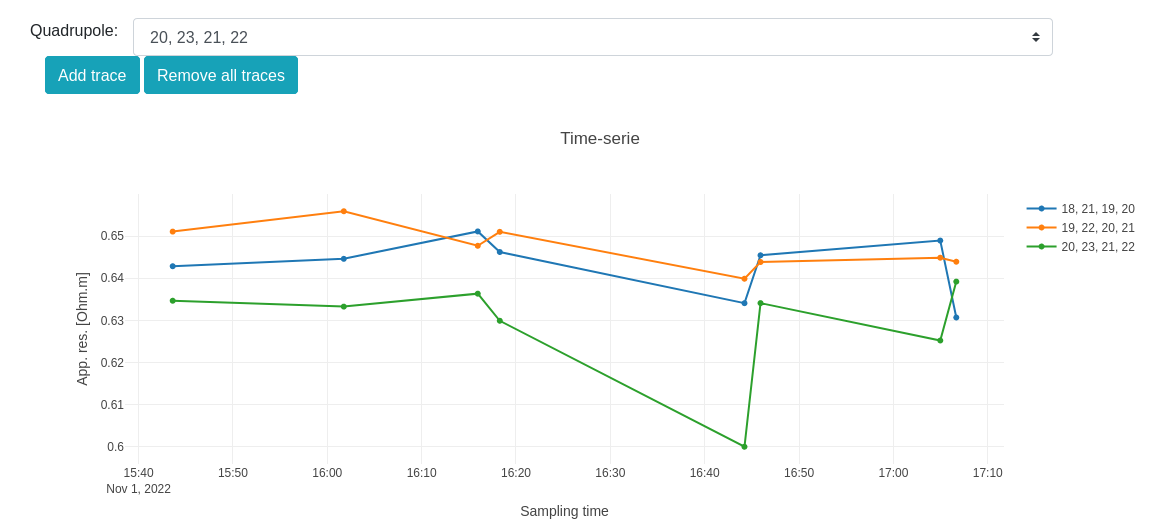
Evolution of quadrupole apparent resistivity with time.
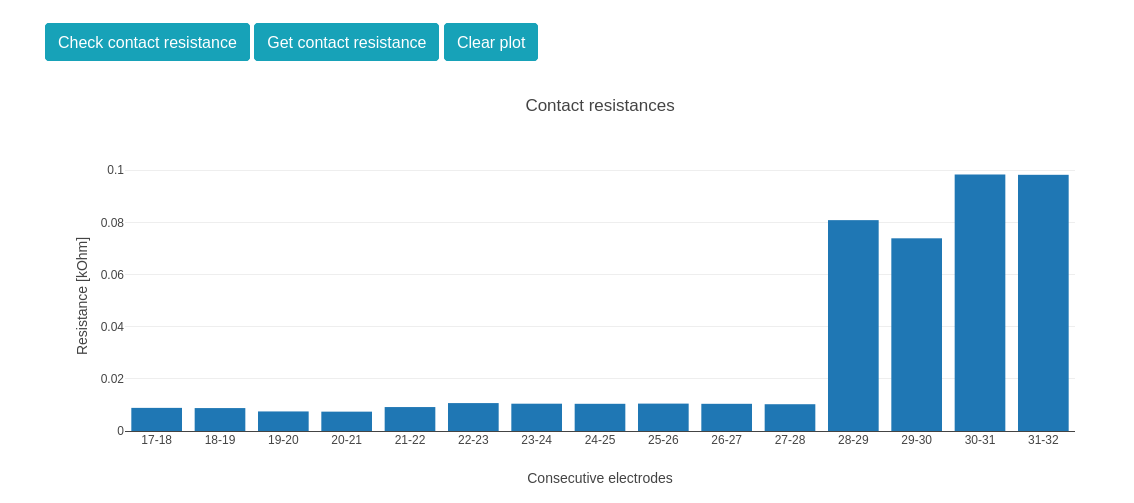
Contact resistance check.
Alternatively to a local webserver, the Raspberry Pi can be configured as a used as a Wi-Fi Access Point (AP). Then other laptop or mobile devices can connect to the WiFi of the Raspberry Pi and interact with the webinterface. To configure the Raspberry Pi to act as an access point and run the webserver automatically on start, see instructions on raspap.com and in ‘run_http_interface_on_start.txt’.
Once configured, the webserver should start by itself on start and once connected to the Pi, the user can go to 10.3.141.1:8080 to access the interface.
Python interface
This interface offers a more direct access to the software components, specifically suited for testing or automating acquisition.
By importing the OhmPi class from the ohmpi.py, we can control the OhmPi instrument via a Python script or interactively with IPython. It involves using the terminal or a Python IDE such as Thonny on the Raspberry Pi. A connection can also be established via SSH (see PuTTY on Windows or ssh command on macOS/Linux).
To access the Python API, make sure that: - the PYTHONPATH has been correctly configured to export the location of the ohmpi module; - you are in the Python environment created earlier (souce ohmpy/bin/activate)
Both of these can be done by executing
source env.sh
from ohmpi.ohmpi import OhmPi

### Define object from class OhmPi
k = OhmPi()  # this loads default parameters from the disk

### Default parameters can also be edited manually
k.settings['injection_duration'] = 0.5  # injection time in seconds
k.settings['nb_stack'] = 1  # one stack is two half-cycles
k.settings['nbr_meas'] = 1  # number of time the sequence is repeated

### Update settings if needed
k.update_settings({"injection_duration":0.2})

### Set or load sequence
k.sequence = np.array([[1,2,3,4]])    # set numpy array of shape (n,4)
# k.set_sequence('1 2 3 4\n2 3 4 5')    # call function set_sequence and pass a string
# k.load_sequence('ABMN.txt')    # load sequence from a local file

### Run contact resistance check
k.rs_check()

### Run sequence (synchronously - it will wait that all
# sequence is measured before returning the prompt
k.run_sequence()
# k.run_sequence_async()  # sequence is run in a separate thread and the prompt returns immediately
# time.sleep(2)
# k.interrupt()  # kill the asynchron sequence

### Single measurement can also be taken with
quadrupole = [1, 4, 2, 3]
k.run_measurement(quadrupole)  # use default acquisition parameters

### Custom or adaptative argument, see help(k.run_measurement)
k.run_measurement(quadrupole,
                  nb_stack=4,  # do 4 stacks (8 half-cycles)
                  injection_duration=1,  # inject for 2 seconds
                  duty_cycle = 0.5) # duty_cycle is
For detailed usage, please see the API reference or look in the ‘examples’ folder.
IoT interface
This is an interface designed for an advanced remote usage of the OhmPi such as remote automation, data consumption by multiple processes and interaction with other sensors in the scope of a monitoring. It is based on the MQTT protocol, designed for the Internet of Things (IoT), to interact with the OhmPi.
This option allows interacting remotely with a single OhmPi, a network of OhmPis, as well as auxiliary instruments and sensors. The communication is based on a publish/subscribe approach and involves a MQTT broker.
An example of MQTT broker that can be used is Mosquitto. Depending on the monitoring needs, an MQTT broker can be set up locally on the Raspberry Pi, on a local network or any remote server reachable through the net. A local Mosquitto broker can be set up and enabled to run as a service on the OhmPi using the bash script install_local_mqtt_broker.sh.
MQTT messages include logging messages from the OhmPi and commands sent to the OhmPi. These messages can be examined easily using a third party software such as MQTT Explorer.
Commands sent on the broker are received by the ohmpi.py script that runs on the OhmPi (make sure ohmpi.py starts on reboot) and further processed. MQTT commands are sent in JSON format following the Python API with kwargs as illustrated below:
{
  "cmd_id": "3fzxv121UITwGjWYgcz4xw",
  "cmd": "update_settings",
  "kwargs": {
    "config": {
      "nb_meas": 2,
      "nb_electrodes": 10,
      "nb_stack": 2,
      "injection_duration": 2,
      "sequence_delay": 100
    }
  }
}
{
  "cmd_id": "3fzxv121UITwGjWYgcz4xw",
  "cmd": "rs_check",
}
{
  "cmd_id": "3fzxv121UITwGjWYgcz4Yw",
  "cmd": "run_sequence",
}
{
  "cmd_id": "3fzxv121UITwGjWYgcz4Yw",
  "cmd": "run_multiple_sequences",
}
{
  "cmd_id": "3fzxv121UITwGjWYgcz4xw",
  "cmd": "interrupt",
}
Custom processing of messages and tailor-made dashboards for monitoring experiments may be designed using a browser-based flow editor such as Node-red. This may help designing complex IoT experiments and monitoring systems in which OhmPi is a component.
Examples incorporating execution commands and data outputs from OhmPi can be found in the OhmPi examples. Once Node-RED is installed on the OhmPi, these examples can be accessed separately by running a command in the console such as :
node-red basic_ohmpi_flows_node-red.json
These examples may require installing some additional node packages in order to work properly. This can be done in the Palette Manager within Node-RED.
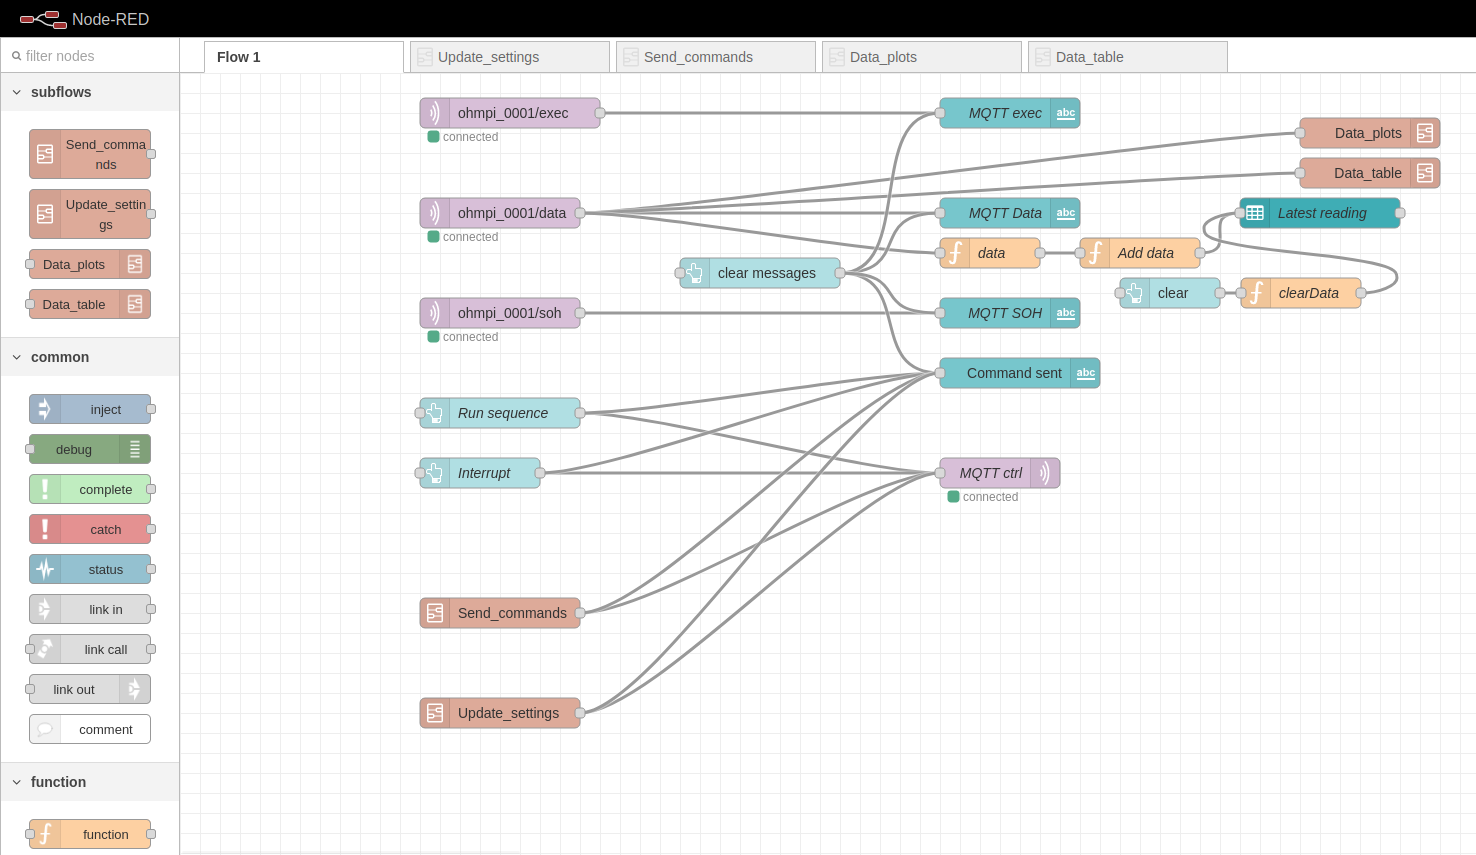
Example flow in node-red to interact with an OhmPi.

Example of a dashboard UI created with node-red to interact with an OhmPi - control tab.
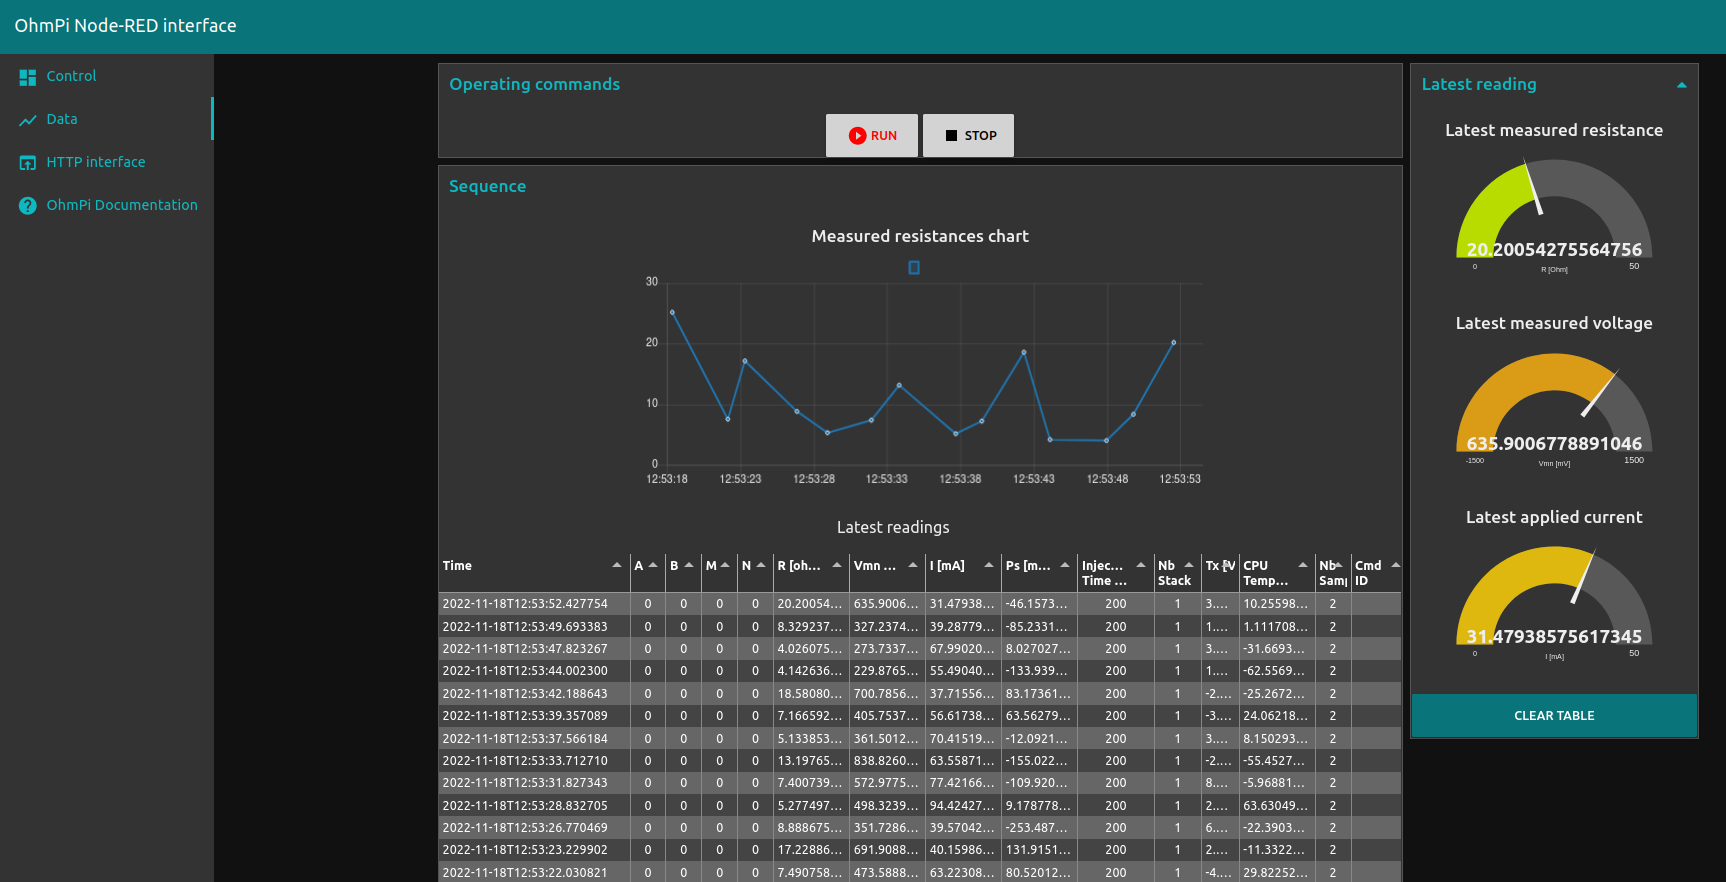
Example of a dashboard UI created with node-red to interact with an OhmPi - data visualization tab.
For more documentation dedicated to node-red, please refer to the Node-red cookbooks.